Showing posts with label our shop process. Show all posts

Monday, November 24, 2014

Join Dan in the Workshop! Project-Porcelain Magnets

We placed an order with one of our Dye Sublimation suppliers last week as we gear up for the holiday season in the workshop.  We always want to make sure that we have plenty of our blank porcelain, ceramic, metal, hardboard, shell, glass, and fabric blank gift items in stock so that we can make items to ship all over for our Etsy customers during the holidays. While we were placing an order for some extra Tea-For-One sets, we came across some really nice looking 2 x 2 porcelain tiles for making your own magnets. Dan decided these magnets would make really nice gift items,so we added them to our order.

You've seen people make magnets by printing art onto flexible magnet sheets, and decoupaging art onto wood, ceramic, or other foundations, but that's not how these are made. Our process is called Dye Sublimation, the art is printed using a specially altered printer that uses dye instead of ink, and then the image is infused into the surface of the item, in this case a porcelain tile.  This process makes the art vivid, permanent, and waterproof. Dan was kind enough to invite you into the workshop to see how he makes his magic using my artwork and his Dye Sublimation skills!


I edited the art in Photoshop to the right size and dimensions. These were printed on our Dye Sublimation printer and Dan cut them apart, and used a spray adhesive specially designed for Dye Sublimation to keep the tiles centered how he wanted them and keeping them from sliding around on the press.
Next Dan lays the tiles out on the art making sure to center the image. The art is a little bigger than the item, this is so that the art will go all the way to the edge without any gaps along the edges.
Next Dan has heated the big heat press to 400 degrees and makes sure the pressure is set right, it needs to really be tight.  It's a combination of heat and pressure that releases the dye into the special coating on the porcelain. 
He has a system, makes sure none of the paper sheets have shifted before he closes the press on them and the timer starts. That big arm on top will swing around and line up with the press bed where he's working. 
Here he is setting the time, then he pulls that big black handle down, it really takes a lot of upper body strength to close that press! I can't do it at all. Tristan and I once made Dan a shirt for his birthday, it took both of us together to close that press. 
The timer goes off, and he opens the press. (which isn't as hard as closing it, but still takes some strength)  The cover sheets, paper, porcelain tiles, and surface of the heat press are now all 400 degrees. He uses an "Ove Glove" and spatula to get the items off the press.
We got these awesome cooling racks, they're meant for cookies, but we can stack them when we're making stuff for festivals or during the holidays so we can get a lot done in a small amount of space.  It's tempting to touch them...I have to walk away for about five minutes while they cool.  Different substrates make the art look different.  For instance, hardboard tiles and aluminum give you a very sharp bold look, these porcelain tiles have a softer fairy tale quality, very pretty.
I use a strong adhesive to affix the magnets onto the back of the porcelain.  These are really strong magnets, we were very pleased. I can't stand a wimpy magnet that will only hold one piece of paper.
Look how thick the magnet and the porcelain is.  I love these, they feel very high-end , they have a nice weight to them, a lovely smooth texture to the surface, and the porcelain has a lovely sheen to it. 
Now to put them on my fridge so I can take photos to post on Etsy...um, wow. My fridge is a mess!  Hang on, let me clear off some of this stuff...what IS that under the kids art, wine or jelly?! *clean, clean, wipe, wipe*  You didn't see that, right?!
Ok, YES! This is how my fridge really looks ALL the time...artistically arranged magnets, polite notes, and a bit of nature magic at work.  (At least as far as Etsy knows, right? We won't tell the truth will we?! ) Click here to see the Etsy listing for these lovely magnets!

That's how we do it! We use that big press for almost all of our items, unless they're coffee mugs, tea-for-one sets, steins etc. We have a round press for mugs, and for some items we use silicone wraps and press them in the oven.  Each item has it's own time, temp, and pressure adjustment. We have loads of templates designed by myself and my teenage son using my artwork on our big workhorse computer that we can print out and press to make all the beautiful things in our Etsy shop.  We hope you had fun walking through the process of one of our newest items, these new magnets look amazing in the photos, but wait until you see them in person. They're fancy enough to make you want to clean off your fridge...or get someone else to do it! Dan would be happy to make a set just for you, here's where you can order a set of your own.

Blessings,
Mickie

Monday, November 17, 2014

Creating New Art for Magical Amulets

Last week I decided to create a few new designs for our line of magical mother of peal amulets.  Sometimes inspiration hits and you just have to go with it.  So I grabbed my pencil, ink pens, and colored pencils and got right to work.

I realized I didn't have a triple moon design, so I wanted a pretty stylized one. I also was inspired by watching the leaves falling here at Aelfheim this autumn, and created the Swirling Leaves Pentacle.  I also did a new Awen for my Druid friends.

First I sketch out the design with a light pencil, then I go over everything and add details using my Staedtler pigment liner ink pens.  I have a set of 0.1mm, 0.3mm, 0.5mm, and 0.7mm.  Once the ink is dry, I erase the pencil lines and scan the art.  Sometimes I clean it up a bit in Photoshop if needed, and then I print out the line art.  Occasionally I add the color right on the original ink, it just depends on whether I need to do clean-up work, or how antsy I get.
Close up of my new cimaruta design, my version of a classic Italian witchcraft and folk magic symbol.  Read about the symbolism of the cimaruta here.

I add lots of color details to the inked art, giving it additional dimension, and who doesn't love a little color?
Working on the cimaruta, Hecate's wheel, and the Horned God.  I turned the triple moon on it's end and re-designed the crescent to represent antlers. I used gold-tones for shading. See my little pillow? That's for my elbow!

I love that coloring is part of my job! When I was a little kid and my friends asked me, "What should we do today?" My answer was often, "Let's color!" And I never got wrapped up in coloring in the lines.  That's a lesson I've used in life too.  Let's face it, I've got a pretty "coloring outside the lines" kind of job I've created for myself. No, I don't use crayons any more, now it's my handy dandy Berol Prismacolor colored pencils!
Almost done adding color to the Swirling Leaves Pentacle.  Read more about this piece here.

Dan was very encouraging as the new designs came to life, as I was finishing up the first three he kept asking me, "How much longer, I want to get these scanned, printed and pressed so we can take photos before the sun goes down and get them in the Etsy shop." I was scanning the first three finished pieces and he ran back to the workshop to get the press heated up.
Above is the first sheet we printed, Dan was excited to get pressing, but I managed to snatch it away just long enough to snap a photo on the old wooden art table so you could see the size of the art next to the originals.  You may notice they're backwards, but they'll be right after they're pressed.
We print the designs to the right size for our blank mother of pearl amulets using special ink that's actually a dye. It's also printed on special paper that's designed to release the dye when  heat and pressure are applied.  The circles and ovals around the art are slightly larger that the pendants, and help us line them up correctly.
They're hot, don't touch them yet!  Dan takes them off the press with a big plastic spatula and puts them on a wire rack to cool.

Here they are cooling on the rack, too hot to touch.  We decided to make both round and oval versions of each design.

The finished Swirling Leaves Pentacle.


My finished photos from the Etsy shop, we raced outside to beat the setting sun. Natural light is the best for photographing the mother of pearl. The glimmering sheen of the shell is so pretty, but it's a challenge to capture photographically, having natural light helps capture the pearlescent quality and keeps the color accurate.

If you want one, Dan will be happy to make one for you!
click here!


Blessings,
Mickie

Thursday, January 26, 2012

Celebrating the Art of the Magical Paths

From the art of The Hidden Path deck, this candle sconce featuring the quizical black cat will bless your home with magic!
Click here for the link.


If you've been to our Etsy shop lately you've probably noticed some new items from some classic art that wasn't there before.  We have recently started a new line of gifts and prints from the art of The Well Worn Path and The Hidden Path.  These are of course the first two decks I created artwork for, and they are sister decks.  The Well Worn Path illustrated the 40 basic teachings of the craft, and The Hidden Path delves into the deeper spiritual teachings.  The concept and accompanying book for each deck was created by Raven and Stephanie Grimassi and these decks have been highly acclaimed and are used for divination, meditation and teaching tools by many Pagans across the country. I put a lot of hard work, imagination and magic into these pieces, each one created with a combination of herb infused paint and painstakingly detailed colored pencil to bring these images to life.  To learn more about how these pieces were concieved and created, click here.  Each piece is full of magic created with the intention that every copy of the art would contain the same energy as the original art, making the printed decks and other items very magical indeed! Needless to say I'm very proud of these decks, and now I'm very pleased and honored to be able to offer you these special items created from the art right in my studio.
From the art of The Hidden Path deck, this magical mortar and pestle in an inspiration for the Kitchen Witch in you! Hang your herbs on candles or keys on this pretty iron rack.  Click here for the link.


A set of 8 oval wall hanging tiles, one for each Pagan Sabbat created from my art from The Hidden Path divination deck. You can hang these all together, or hang one and change it as the Wheel of the Year turns. A truly magical way to celebrate the magical holidays of the year. Click here for the link.

For now, this very special art will find it's home in the Mickie Mueller Studio shop, but as we add new items, we will very likely give these special pieces their own home in their own shop.  You'll see new items added every week, but I want to make sure that everyone knows that every card from both decks are available on any of the products that we offer in our shop, even if you don't see it, we can make it for you custom, and we don't charge a dime extra to do it.  Our goal is to be able to offer you what you're looking for, and since we make all of these beautiful items ourselves, it's never a problem to make something special just for you, it's our honor.
This wall sconce is made of an iron frame with a 6x6 inch ceramic tile with my art from The Well Worn Path "The Crossroads" featuring the triform mask, key and symbols of the Goddess Hecate. Click here for the link.

Every card image can be made into beautiful items for your personal and ritual use such as:
  • tote bags
  • candle sconces
  • crystal jewelry
  • key/herb racks
  • compact mirrors
  • coffee mugs
  • ornament/car charms
  • oval wall tiles
  • handbags
  • tarot/oracle bags
  • beer steins
We hope you share our excitment about these cool new items, and watch for more beautiful things coming soon, we love making beautiful, magical things for you!

Bright Blessings!

Tuesday, January 24, 2012

This Isn't Your Moms Designer Handbag!

I've been using this purse for six months and I love it!  Now available in our Etsy shop.
Who wouldn't love a fantasy art handbag that's classy, functional and magically changes whenever you want it to?!  I do!  That's why we're so excited about the brand new product we're adding to our studio line.  Click here to order!  About six months ago Dan and I ordered a couple of these cool purse bodies with changeable flaps that we can add my art to using dye sublimation set up we have in the studio.  Now, I'm often kind of hard on purses especially if they're not leather.  Everytime I would get a cheap-o one it seems like they would fall apart, When these purses arrived, they seemed like really good quality, so I decided that I wanted to test this purse to see how it would hold up.  Some people around town saw me carrying it and really loved it.  They wanted to know if they could get one, then I explained that I was testing it to make sure the quality was good and that I would be offering these purses as long as it held up well.  I'm happy to report that six months later, I totally love this purse! 
You can choose whichever piece of art you want, or we'll be happy to custom make one with your favorite art on it if you don't see it here!  Available in our Etsy shop, http://www.etsy.com/shop/MickieMuellerStudio

Dan and I worked on making some new purse flaps for our shop last night so we can offer them on in our shop. They are very pretty, black faux leather, so they're cruelty free.  It measures 11.75"H x 7.8"L x 3.5"D, I can fit a large wallet, Nook, cell phone, lipstick, compact, and lots of other various items of junk I feel the need to tote around in this bag.  I've not had the best luck with purses that aren't leather, but this one has held up great under my use and abuse.  It has an adjustable strap, so you can use it as a hand bag or make it long so that you can wear it across your body or anywhere in between.  It's not too big, not too small, it has a full zipper pocket,  interior zipper pocket, cell phone holder and even a key clip, so your keys don't sink to the bottom like they do. 


The adjustable strap attaches with shiney nickel clasps.  The front flap has one of my art pieces on it with a cool decorative black and gray border design that compliments the purse details and you can get extra flaps with different art and change the front flap depending on your mood, season, or outfit! 

This allows you to dress this purse up or down, from gypsy boho chic to office casual and anywhere in between.  We hand press and detail these flaps in our studio just for you.  I love that you can change the look of your purse without having to move all your stuff from one to another, super easy.  If you have to clean the purse body, just wipe it with a damp cloth, the fabric purse flap can be cleaned with a baby wipe, although after carrying mine for six months, I stil haven't had to worry about it, it still looks a vibrant and pretty as the day it was pressed.

We only have a couple at this date, but more are being shipped to us even as I write this, so if we sell out, don't dispair, we'll have more by next week.

Blessings,

Thursday, December 1, 2011

Manly Steins Made With a Bolt and Wrench!


We have a cool new item that we're making in the studio (and the kitchen) These ceramic beer steins are a real favorite among beer enthusiasts.  These German style Steins have the look and feel of a stein from the old country. These steins are white ceramic with gold trim, and dishwasher safe, but shouldn't go in the microwave due to the gold trim.

We've made a few of these for friends and every dude that's received one says it's his favorite drinking vessel!

While we were pressing the images on some steins to put in our Etsy shop for the holiday shoppers, we thought you might like to see the process, it's pretty cool.  Most of our dye sublimation products are made on heat presses in our studio, but the shape of the steins require a slightly different technique.

Mickie has created designs from her art using Photoshop Elements, we print the design backwards on "Frankenprinter" our special printer we use for our dye sublimation, it uses dyes that can bond with the ceramics.  We also use a stein from one of our dye sub suppliers that's been coated to accept the dye. 
The design is positioned on the stein.
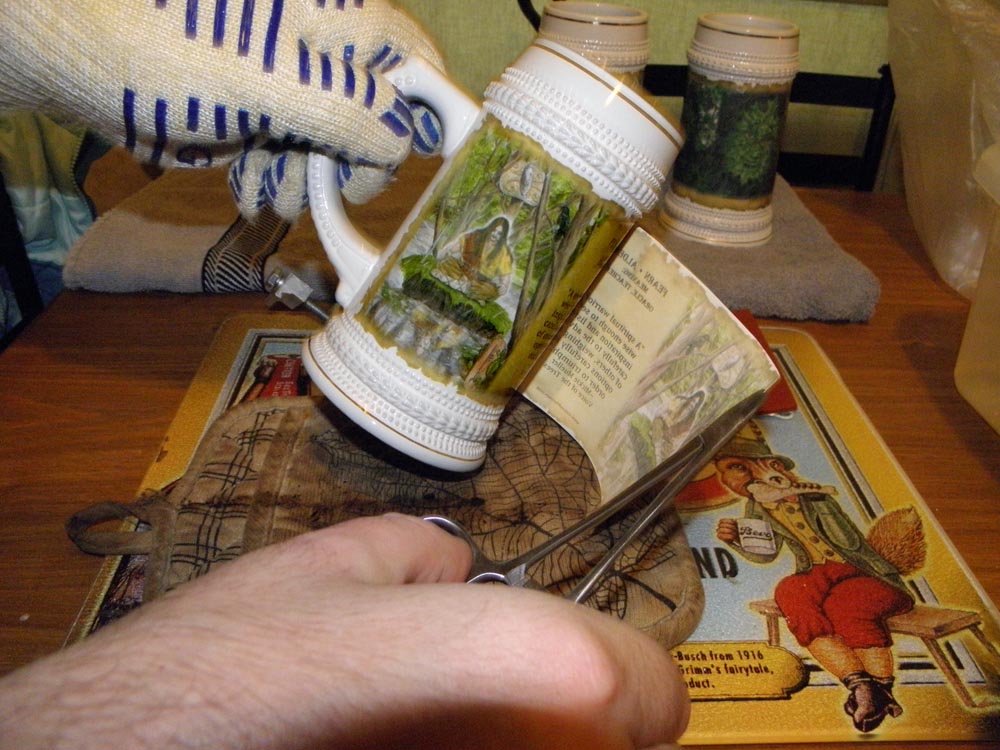
Next Dan puts on the oven wrap.  He has to tighten it up with a wrench to make sure there is sufficient pressure to transfer the design.

The stein is paced in a 400 degree oven.

When it comes out, that bad boy is hot!  Dan has to move it quickly to a work surface because the heat goes through the O've Glove quickly!

He carefully removes the oven wrap...hot, hot... and then the paper revealing the design on the stein.

It's like magic every time!


The stein is submerged in a tub of water to cool.

It's done and ready to hold your icy cold brew, mead or beverage of your choice!

 We thought you might enjoy seeing how we make them, they are really great to own, and even cooler when you see the process.

Blessings,

Wednesday, September 21, 2011

The Magic of Oval Art Tiles

We love our oval art tiles and wanted to share with you all to great things about them including ways to use them for decoration, and yes, even for magic!  When we go to festivals, our 4" x 6" ceramic oval wall tiles are really popular, people pick them up, hold them in their hands, and just love the feel of them.  We think there are many reasons for this, here are a few of our favorite reasons that we love them, we think you will too!

Lady of the Forest peers out mischievously from this wall.
  • Great to Collect: These tiles look really nice hanging in groupings on the wall.  We know someone who had an open space over a long doorway and filled it with a row of fairy oval art tiles.  They also look nice hanging with a grouping of other items like candle sconces, wreaths or art.
Solar Eclipse, the embrace of the Sun God and Moon Goddess, wouldn't this add lusty energy to your bedroom?!
  • Magical Uses: These tiles can make really great permanent magic for your home. You can write on the back with a fine line permanent marker or metallic paint pen, so why not add your own magical symbols or charms to the back and charge it with your intentions. Bridget could add happy home and healing energy. Use the Rowan Fairy to shield your home from negative energies. The Oak Fairy or Greenman could hang around and add a boost to your finances!  You could also add an herbal wash to the back and let it dry before adding your writing or symbols for an extra magical punch. 
  • Affordable: At only ten bucks each, these tiles are a great value. These beautiful gloss finish ceramic tiles are a beautiful decorative piece to hang on your wall. They measures 4" x 6" and are a great way to collect artwork when you're on a budget.
    
    Tatianas New Dress, I have one in my bathroom which is all decorated in greens and fairies.
  • They're so Pretty:  The look of the art printed on these ceramic tiles gives it a very attractive soft look.  The fronts are glossy, and the back is uncoated ceramic.  The art is not paper decoupaged onto these tiles, we use the dye sublimation method to make these tiles right in our studio.  The art is printed using special dyes and then with heat and pressure the dye is actually infused into the surface of the ceramic. 

  • Versatility:  They come complete with a hanger already on the back, so you can hang them wherever you want, and you don't have to buy a frame, it's self contained and ready to go.  Great for hanging near your altar, or they can be displayed on a small easel.
Here's what the backs look like.

  • Gift Giving:  Because they're so affordable, they make great gifts, many of our customers have told us they've given these as gifts.  One bride ordered several to give her bridal party, she wrote the names and date on the back with a metallic pen to make them personalised keepsakes of her special day.  We also had a customer pick one up to give as a gift to someone as an initiation gift.  Who would you give one to?

  • Convenient Size: For people who don't have room for prints but want to own a piece of this magical art, these great art tiles are a great solution, you can always find a little nook or corner to display one of these sweet oval tiles.

   That's what our oval tiles are all about, a really classy looking and affordable way to add flair to any room.  We have loads of them now in our Etsy shop http://www.etsy.com/shop/MickieMuellerStudio and adding more over the next 24 hours.  If you ever see any of Mickie's art that we don't have an an oval tile, drop us an email or convo, we're happy to make you a custom one.

Blessings,