Showing posts with label art tutorials. Show all posts

Saturday, March 5, 2016

How I Conjured Up a Brakebills College Jacket

Yes, you guys already know...I'm really enjoying the new TV Series The Magicians on SyFy. Truth is, I really started getting into it because they ordered prints from me to use on the set, (read more here)  (...and here) however now I'm totally sucked into the story and awaiting every new episode! I also downloaded the first book in the series to my tablet which I'm thoroughly enjoying reading in between art and writing. So... I've been wanting to try a cool technique from Pinterest for decorating shirts and I knew I wanted to make, a Brakebills College jacket! I know, in the book it's a graduate school, but they didn't want to end up with a problem with kids aging too quickly to keep up with filming the series, so they changed it to a University. If I couldn't get one from Brakebills College bookstore in Upstate NY (don't tell me it's not real...) I decided to make one myself!


I conjured up a one of a kind Brakebills jacket, and I didn't have to use a series of complex hand gestures or speak incantations in obscure languages! All it took was a $5. sweatshirt jacket on clearance, (I used a Hanes ComfortBlend 50% Cotton 50% Poly) a pack of vinyl poster letters, freezer paper, craft knife, a little spray bottle, and some bleach...and my crafty witchy self!

I loosely based my design of the Brakebills "Key and Bee" shield on a screenshot from the show, I needed to simplify it in order to make a template. I cut the shield outline out separately, then cut out a template for the Key and Bee. Rather than plain paper, I used freezer paper. I drew it out on the papery side-the plastic like coated side was the back.


I didn't want to cut out all those letters too, so I found these easy vinyl letters. They have sticky backs for use on poster board signs, they were perfect!

First I positioned the shield outline, then I ironed it onto the shirt. Freezer paper is perfect, you can iron it on so it leaves a nice clean edge and it won't shift or lift while you're working. When your done, it peels off easily with no problem. After I ironed the shield I positioned the letters, they stuck great with no ironing needed, peeling off easily later.

Next I filled a small spray bottle with straight bleach, (lavender scented, 'cause I'm fancy like that) and spritzed right around the edges of the shield and the letters and watched as the areas I lightly sprayed slowly began to lighten up! Seemed pretty magical! Then I took the top off of the bottle and used the straw part to flick bigger drips and drops of bleach all around, giving it a cool edgy magical look. I was, having so much fun, I forgot to take a pic in between! While I forgot to grab my phone and take a shot, when I was pleased with the way the bleach around the shield was developing, I lifted up the shield template and positioned the key and bee carefully over the black place where the shield had been making sure it was pretty well centered within the black shield outlined with the bleach spray...


I ironed on the key and bee and then sprayed it with my little bleach bottle. I let it sit for a short time, then sprayed more. I probably repeated 3-4 times, I wanted the key and bee a little lighter than the faded outline.

Damn!!! It turned out cooler than I even imagined! I went ahead and added the same design to the back too.  Then I decided to also add the Brakebills letters down one arm like I've seen on college jackets. Before you ask, nope, this will not be for sale... copyrights, intellectual property, and all that,I made this just for my personal use. That's why I'm not sharing this template either, not to say you can't create your own for yourself! In the future I may offer a totally different design of my own and offer a downloadable template and complete instructions. This was a really fun project and I totally want to make more shirts, jackets and stuff!

This process was kind of addictive...much like magic!

...the jacket is addictive too, it's my new fave!


Then...after all that work....I discovered The Magicians Cafe Press store! I could have bought a jacket!! The author of the books Lev Grossman had fans do some really cool designs for shirts, jackets, and other stuff...I think I might need to get a shirt to wear with my new jacket...maybe a sticker for the car...tote bag...be sure to check it out here:
http://www.cafepress.com/mf/58303574/the-magicians_tshirt?productId=1717603879

I also found this tutorial before I decided to try this technique myself and it was my inspiration for this project. Lots of great practical advice on how to do bleach t-shirt design! http://www.stencilrevolution.com/tutorials/bleach-fabric-guide/

Blessed Be!

Mickie

Tuesday, January 12, 2016

A Badass Logo for Some Badass Roller Girls

I designed a logo for a local Roller Derby team that my friend Tanya is on recently, I just found out that it's been approved! Whoo-hoo! I present the official logo for Franklin County Fury!


I'm really excited, can't wait to go watch them sometime! This was a really fun project, I thought you might be interested in seeing some of the "work in progress" shots of this fun piece.

First, I submitted a sketch to make sure I was going in the right direction for what they wanted. They had shown me a couple examples of stuff they liked, and told me it should be a fierce roller derby girl with flames coming from her skates, so I went from there.


Once I had sketch approval, I hand inked the derby girl...


Then I scanned it and added the font digitally. 


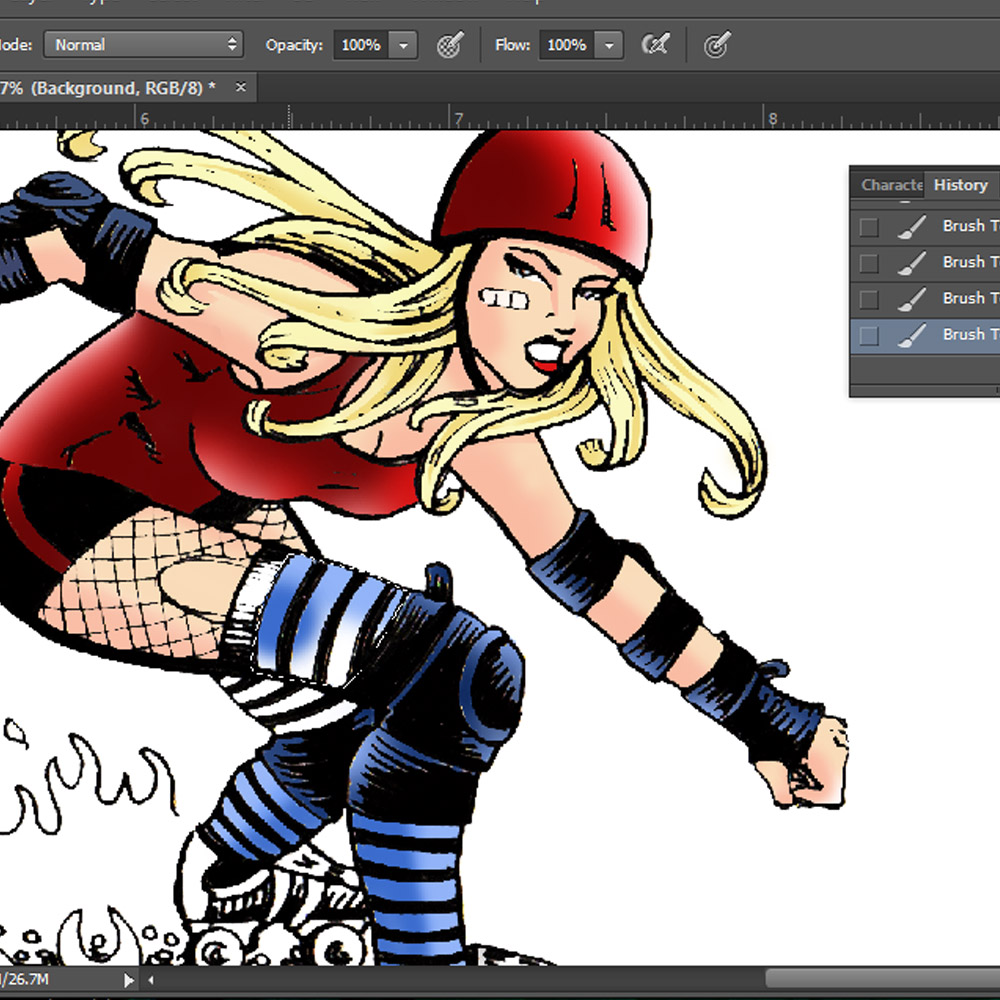
Then I colored it on the computer in Photoshop using some techniques that I used to use back in my days of comic book color fill when I worked for Network Color. I turned the ink drawing into a transparency and traced each section out using the lasso tool. One by one I added color to a layer behind the inked art.


We used to add color to comic books for DC, Marvel, Disney, and Darkhorse to name a few, it was a really fun job. I met my husband Dan at that job, back then we were just friends, so when I finished up the coloring, I surprised him with it and asked, "Hey Dan, can you check my page?" It was just like the good ole days, we had a laugh over that!


I knew the ladies would want a full color version, but I figured that for some merchandise, newspapers, etc. they might need a black and white version as well, so I made sure to save an uncolored black and white version also.

What they need was a tough as nails but sexy roller girl. I had fun researching the proper protective gear, accurate poses, and wild clothing they wear. These gals proudly wear their war wounds like medals of honor, so I just had to include a band aid on her cheek and a tear in her fishnets! I wanted her to be sexy but not demure in any way, she had to "own" it, fierce and strong. 

When we talked about color, they told me that red is their team color, but they wanted some other colors in there too. Since flames was a "must-have" for all the team members, I decided to add some of that "hot blue" into the flames that you so often see and pull that color up into the roller girls outfit as well.

If you live in Franklin County and want an amazing night of fun, come check out the Franklin County Fury, also watch for t-shirts and other cool merchandise with the logo I designed for them coming soon!

Click here for Franklin County Fury Facebook Page

Want to know more about Roller Derby? Check out the Franklin County Fury FAQ


Monday, August 12, 2013

How a Mystical Cat Becomes a Card

I've had many people curious about the process of creating tarot cards for a deck.  It's actually a very interesting process.  


To show you the steps, I'll take you through step by step of the Queen of the Sea Cats card from my upcoming deck Mystical Cats Tarot.  The first step is to determine the vision for the card.  On this project, I'm working with author Lunaea Weatherstone, so I get my initial direction from her.  Usually we have a phone discussion about the card and I get a written description for how she wants the card to look, the feel she wants to convey, and any specific elements she wants to be included in the card.  We modeled the cat for the "Sea Queen" after a beautiful real life cat as well, a cat that Lunaea knows, so she sent me several photos of the cat so I could see the markings, eye color, body type etc.  

I take all of the information and visualize it in my head, and then I draw a rough sketch.  
This is the very rough sketch, mostly to show placement and visual concept of everything
to Lunaea in case any changes need to be made, this is a very small sized sketch.
This brings all those ideas floating around into sharp focus.  For this card I found lots of inspiration looking at classic fountains, especially ones with mermaids on them.  Since this is the world of Mystical Cats however, it seemed obvious to me that it should be a mer-cat instead!  Once the sketch was complete, I emailed it off to Lunaea to make sure it fit her vision.  Then upon approval, I was ready to start creating the finished piece.

The next step is to transfer the sketch onto a sheet of smooth hot press illustration board.  Once I have all the details I need in place, I use a liquid frisked to cover up all of the areas of the art that I wish to remain totally white.  These are the areas that I will be working in colored pencil. Right now I'm using Art Masking Fluid by Windsor & Newton, although Grumbacher makes a good one as well.  It's kind of like a very thin rubber cement.  I recommend using a very cheap brush to paint it on, I use kids throw-away brushes with brightly colored plastic handles and trim the bristles as needed.  This stuff will ruin your good brushes, so don't go there!

Next  I mix up my special herbal wash.  I've chosen herbs for each card to correspond with the suit, card, and general feeling of the card.  This is how I add magic to every piece of art that I create.  It helps me to raise the appropriate energies of the piece so that I can make it vibrate with the correct intention and purpose.  In this case I used catnip, lady's mantle, kelp and a drop of water from the chalice well at Glastonbury that was given to me by my friend Shea, who traveled there.  This magical infusion is the water that I use for my watercolor wash, allowing the herbs I've chosen to work their magic and get the creative juices flowing. 
The finished sketch covered with liquid frisket after I've painted it.

 As I work with the paint, the frisket repels the paint from the areas to remain white, so I paint right over he top of it.  
The reveal: peeling the frisket from the painting, all those white areas will be layered with colored pencil.

Once the paint is completely dry, I peel off the frisket and the tape that marks the edges and I get to work with the colored pencils.  I work each section, usually adding the shadows first and working out towards the highlights.  I use Berol Prismacolor pencils, I love the variety and blend-ability  of them, I've been working with them for over 25 years.  As I work, I sometimes use a colorless blender, which is like a pencil that has no pigment, that helps blend multiple odors together and fill in darker areas so that less of the white paper shows through while it bumps up the color.  I work across the board bit by bit creating an entire world from the tips of very sharp pencils.  
A long way to go...


Really getting into the mosaic!

When I'm totally done with the colored pencil step which can take several days to complete, I look over the area and sometimes layer more watercolor over the top of the colored pencil.  I do this in order to fill in any areas where white shows through due to the texture or "tooth" of the illustration board and to make the colors "pop" a bit more.  
The Queen of the Sea Cats, complete!

Then I carefully add highlights to the cats eyes and whiskers, and the card is complete!  I scan it and email it off to Lunaea and then on to the next!  This is the process by which all 78 cards for Mystical Cats Tarot are (and will be) completed.  Then the original art for the cards will be whisked away to Llewellyns art department where they will do their magic to design how the finished cards and packaging will look.  This spring watch your local bookstore and you can pick up your very own copy of Mystical Cats Tarot.  I the mean time, why not pop over to the Mystical Cats Tarot Facebook Page https://www.facebook.com/MysticalCatsTarot and hit the "like" button so that you can see all the sneak peeks as they are released!

Brightest Blessings,

Mickie Mueller

Saturday, April 27, 2013

How to Create a Watermark for Your Art in Photoshop Elements


I've had quite a few artists contact me wanting to know how to make a watermark for their art like the ones I use on my art.  Why use a watermark?  Well, there are several reasons.  One reason is that nice well meaning people often see your artwork, love it,  and want to share it on sites like Pinterest or Facebook, the problem is, they don't always think to give you credit for the art or link it back to you.  If you put a watermark on there, any of their friends or followers that see your art will know that you created it, and if you put your website on there as part of your watermark, they now know where to find you if they want to see more of your work or buy a print.  Another reason is that sometimes people find art on the Internet and they think that just because it's there online, anyone can use it for anything that they want.  According to copyright law, that's not true, but it can be hard to stop people anyway.  The next thing you know someone has grabbed your art from a Google image search and slapped it on jar candles, boxes, or a variety of other items and they're selling them on eBay or Etsy as their own creation.  If you have a watermark on there, it makes that kind of thing really hard for them to do and lets the art pirates of the world know that your art is protected by copyright.

How do I know all this?  I learned the hard way years ago, I've had both of these things happen to me.  There are still un-watermarked versions of my art floating about out there on the web, and once they're out there, they're out there!
The World card from the Upcoming Tarot deck Mystical Cats Tarot with Watermark.  

 We're just beginning to put images from my upcoming Tarot deck "Mystical Cats Tarot out there, so I needed a new watermark.  I thought this would be a perfect opportunity to show you how I do it!

Watermark Tutorial: Photoshop Elements

I use Photoshop Elements to edit my art, it's really close to the same as the full version of Photoshop, not too hard to use, and it's pretty affordable, less that a hundred bucks compared to it's big sister Photoshop (the full version) which is more like a whopping seven hundred!  I've used both and believe me, if you're just starting out, get Photoshop Elements!  I gave you step by step instructions and screenshots, because we're artists, we're visual, and a picture is worth a thousand words! Click on the images if you need to see them bigger.


  1. In Photoshop Elements open an image that you want to add a watermark to.
    Adding the text, include copyright symbol, your name and website if you have  it, or any
    other information that you feel is appropriate for the project.
  2. Select the type tool, its on the left and is just a letter "T" Pick a font that is easy to read, if there is an option to make it bold, do it.  Now type out whatever you want your watermark to say, it's a good idea to include the copyright symbol, your name, and website if you have one.   Ahh, I know, you're asking, How do I get that little © symbol? !" Here's how, hold down the ALT button and while you do type 0169 on your keyboard.  It will appear like magic! Are you on  a Mac? then hold down the Option button and then type a G.
  3. Now highlight the letters and click on the color swatch on the left hand side, it's that black square. (or whatever color your text is at the time) When you do, a window will pop up that lets you select a color, change it to 50% gray.  Make sure "Only Web Colors" is not selected and then enter the values R-128 G-128 B-128, as shown in the picture below. Click OK
    Changing the text to gray.
  4. If you want to add a logo, now is the time to do that.  If you don't want to add a logo, skip ahead to step 7.  I created a logo from one of my sketches of a cat paw shield design from the deck and filled it in with 50% gray just like the letters. Open your logo, use the magic wand tool to select it away from the white background and drag it onto your art.  
    Select the logo, click and drag using to move tool, just drop it onto the art in the window below.
  5. Now you can re size it using the move tool (the little 4 arrow thing at the top) and drag it around until you have it right where you want it. When it looks just how you want it to, click the green check mark.
    Using the move tool, you can re-size and re-position the logo.
     
  6. Now, on the bottom right you'll now see three layers; your art background, the text layer, and your logo. Holding down the Shift key, click the logo layer and then click the text layer. Now go up to "Layer" at the top of the screen and click it, then click "Merge Layers."  Now you have just two layers, the background and the watermark you've just created!
  7. Now to make it fancy and see-through! You'll see the layers on the bottom right, make sure the text/watermark layer is highlighted in black (it should say Layer 1) and then click Layer at the top of the screen, scroll In the layer styles palette choose "Layer Style" and then "Style Settings" from the drop down menu. Now you'll see a window, click "Bevel" now you can use the slide bar to adjust the bevel until it looks great.  This step really helps your watermark stand out. when you're happy with the look, click OK at the bottom of the bevel window.
    Select Layer, Layer Style, Style Settings, then a window will pop up,
    select Bevel, then adjust it however you like.
  8. Now making sure that the watermark layer is selected look right above the layer and you'll see the Opacity bar, click the arrow and adjust how transparent your watermark is.  Just play with it until it looks good, you want it to be able to be seen while not distracting from the art too much.  You'll find that you might want to adjust the opacity differently for each piece of art.
    A close up of the watermark
  9. Congratulations!  You just made an awesome looking watermark!  Now you need to save it.  Delete the art layer (Don't worry, we'll bring it back!) Just left click on the layer to the right. and select "Delete Layer" now grab the Crop tool from the left side and crop around just the watermark. Got to "file" "save as" and save it where you know you can find it again and title it something like "watermark" so it will be easy to find.  Be sure to choose the format Photoshop (*.PSD;*.PDD) this will keep it on a transparent layer and make it easy to drag and drop onto anything you want to put it on.
    Remove the art layer for now, crop and save as a transparency, PSD file.
    Now you can use it again and again!
  10. Now open your art again, and using the move tool grab the watermark and drag it right onto the art.  You can move it around, and even re-size it using the move tool.  Once you're happy go up to Layer at the top and click "Flatten Image"  Then save your art as a JPG.  I usually name it by the title with the word "web" at the end so that I know it's the version with the watermark. For this image I called it TheWorldWeb.jpg
I hope you find this tutorial useful as a way to protect your art online and direct fans back to your website!

Happy Art and Blessings!


Saturday, February 9, 2013

An Easel for Better Ergonomics

Well, I turned 48 yesterday, and I must say that years of hunching over my art hasn't done my back any good at all except for an opportunity to earn money to pay the chiropractor!  My dear Dan has always had a knack for coming up with the perfect gift for me because sometimes he knows me better than I know myself, this year is no exception!  I was totally delighted when Dan and our son Tristan presented me with a beautiful new box table easel for my birthday this year!
Taa-daa!!  I love my new easel!! It saves my back and stores my paint too!!

I had been experimenting with different positions to do my work because I'm trying to rock out 78 cards for my upcoming publishing project with author Lunaea Weatherston, Mystical Cats Tarot, (click here for a sneak peek) and let me tell you, that's a lot of cats!!  So I had propped up a piece of super firm cardboard that was about 4 layers thick and was using it as a sort of make-shift easel, just to see if the position would suit me never having worked on my drawings in a vertical position before.  Lynne Menturweck from Llewellyns art department warned me that I would notice new and different sore muscles I got used to it,  and she was totally right, and I'm glad she mentioned it or I might not have kept going, but I did.  Once I got used to it, it was amazing.  My upper back and shoulders were feeling much better.  And Dan was very happy for that, but I think he was tired of looking at me drawing away on that big chunk of cardboard propped against my table with a yoga block to get the right position.  LOL
"If I only had an easel...the bells, the bells!!!"
I had some of that foamy non skiddy shelf liner, so I used double sided tape and mounted a big piece to the bottom, now it won't scratch up my old wooden art table and I can lean on it as I draw without it sliding.
Putting shelf liner on the bottom protects the table from scratches and keeps
 it from sliding.  I just mounted it with double sided tape
 so I can remove it if I wish.

Since I usually work on illustration board and not canvas, I needed a board to put in the easel that I could tape my art and reference photos to.  Tristan ran with me up to the hardware store where I planned to get some Masonite, but instead we found a beautiful piece of very smooth birch.  Birch is one of the sacred Celtic trees and is a tree of magical new beginnings, inception and birth, it offers success in new projects.  I can't imagine a more magical wood to mount my artwork to while I work!  They cut it to size for me, 16" x 20" and then Dan and I used our sander to smooth the edges down.  Eventually I'll stain it to match the desk, but for now, I have art to do!

So here's my set up, I had a couple of little touch ups to do on some art for a
new item we're going to have in our Etsy shop.  I folded a tapestry that I can rest my elbow
on from time to time.

I really love this set up, my back stays straight while I work, no more hunchback for me, and since I've been using the "cardboard chunk easel" my neck and shoulders have improved tremendously!  I highly recommend trying this to any artist who hunches over their work, it might not be for everyone, I was really dubious being an old dog that doesn't always like new trick, but I'm so glad I did it!
Instead of hunching over, I just lean in, back straight, and draw!  Artist tip: That's
the low tack tape that house painters use to mask off areas, it's more affordable
than the fancy stuff marketed to artists and a roll of it lasts forever. 
The best part is, you can remove it without tearing up your paper or illustration board.
 I used to used regular masking tape but have since switched to this with great results!


Another shot of my new drawing position.

Do you want to know more about the project on my board?  It's already off again as of this writing and one of my Mystical Cats for the new Tarot Deck has taken it's place, but this is a sheet of designs for some new totem animal jewelry pieces we're doing.  I drew them, we scanned them and printed them on our Dye Sublimation printer, then Dan pressed them onto these amulets:

Raven Totem Animal Mother of Pearl Amulet,
available here: Mickie Mueller Studio Etsy shop

Here's Dan modeling the Snake Totem Animal Mother of Pearl Amulet,
available here: Mickie Mueller Studio Etsy Shop

Happy Art and Brightest Blessings!


Tuesday, January 22, 2013

Spell A Day, An Inspiration Spell for Removing Creative Blocks

The other day while I was on the computer I had one of those CAPTCHA questions to answer, instead of just asking me to retype a twisted up phrase, it asked a question with multiple choice answers.  The question was "Which one is hardest?" 
The choices were:
1 picking up a pen
2. staring at blank paper
3. going for a walk
4.writing a novel
Drawing a BLANK...

I laughed and told Dan who was sitting there with me, "I know the answer is "writing a novel" but man,  staring at blank paper can be pretty hard in it's own way!!"
Over the years, I've had many creative types, writers, artists, etc. ask me if there is a good way to cure "creative blocks."  My advice is usually the same, "Quit doing what you're doing and get outside your comfort zone!"  That was the inspiration behind todays spell in Llewellyn's Spell A Day Almanac, which I have a link to at the end of this article.

Yeah, it's just like that!
It seems like staring at the blank page is the thing to do, that somehow forcing it the way you would attack an unopenable jar of pickles would be the answer, but creativity just doesn't work that way.  Your art table, computer, or wherever you choose to create isn't where your inspiration is born, it's just where you express your inspiration.  If you're feeling like you don't have any new ideas, or good ideas, then you need to take your brain and feed it, and not on the same old stuff.  You must give yourself new experiences in order to blow out the cobwebs and get your brain moving.  If you love nature, sitting in a garden might help, but if you're muse is really shut down, you might need to wake that muse up by doing something drastic and completely out of your nature or comfort zone. 

Now, I'm not talking anything illegal, but do something that you would never usually do, if you really don't dig country music, get thee to a honkey tonk bar!  If you've never seen a live play, Shakespeare in the Park!  Never been out of your home town, guess what...road trip! Are you nervous about the idea of trying something new?  Good, that means it's already working, you can do it, and your reward will be great!  Your muse is just a personification of that creative part of your mind, and that part can get bored.  Your outing doesn't have to be related in any way to the project you're trying to work on, but whatever you do, make it a brand new experience, that's what feeds your creative mind, and gets those synapses firing on all cylinders!

It's like magic!  If you're a magically inclined creative person, you can boost the experience and bend it towards your goal by using the following spell as a focusing tool for the exercise of taking your muse out on the town.  I wrote this for Llewellyn's 2013 Spell A Day Almanac, I hope you enjoy it!
All you need for this spell is a bag of mint tea, a journal and someplace brand
new to drag your snoozing muse.  Creative block? This is your wake up call!

Inspiration Spell

By Mickie Mueller, Spell Date: Tuesday, January 22, 2013

Color of the day: Red

Incense of the day: Basil
"Has your creative muse been napping? If everything seems solemn right now, the best way to get your creative juices flowing is to shake things up a..." Click here for the full spell!

You can use the power of creativity in many aspects of your life, not just artistic pursuits, inspiration can be applied to even the most mundane of tasks in order to get better results, so start thinking outside the box.  Where to begin, stepping outside your door and your comfort zone!

Interested in picking up a copy of Llewellyn's Spell A Day Almanac for 2013?  Click here!

Blessings!

Saturday, May 28, 2011

Fellow Artists at Heartland Pagan Festival and Resources for Artists

Dan and I are having a wonderful time at Heartland Pagan Festival hosted by the Heartland Spiritual Alliance outside of Kansas City, the land is just gorgeous and the people are fantastic!  Heartland is one of the largest and oldest Pagan Festivals in the United States, we're delighted to be here.  I'll post more about our adventures at Heartland (and photos) later next week when we get back.

I did a workshop on Friday afternoon about creating fantasy/fairy/Pagan art, and I got to meet many other artists, some just budding and some well on their way.  I discussed my artwork, and how I add magic to my artwork, and my journey as a magical artist. I shared some inspirations, suggestions and tips on how artists can hone thier skills and get their work out there, options for producing their own prints and merchandise, as well as how to get started with publishing their art.

I wanted to share some of resources here that I mentioned for easy access for those who attended the workshop so they will have them at their fingertips and anyone else interested for that matter.

http://www.clearbags.com/  Clear Bags is a great resource for packaging products for prints, cards, bookmarks, and they carry backing boards as well.  The bags I like are the protective closure bags, they're acid free and a great way to display and sell your prints.

http://www.cafepress.com/  Cafe Press is a great way for an emerging artist to offer really cool merchandise featuring their art without the start up cost of the equipment needed to make your own merchandise.  You upload high res art files to the site, choose what merchandise you want the art on, and they sell it, make it, and ship it for you.  You earn a percentage off each item sold on their website.

http://www.zazzle.com/  Zazzle is another service similar to Cafe Press, I haven't used it, but I know many artists who have with success.

http://www.psprint.com/  PS Print is an online digital printer, the offer brochures, business cards, postcardes,and even posters, an artist could get lots of ideas for promotional materials here.  Watch for their sales which they run frequently so you don't have to pay full price for their printing.

http://gofree.com/download/Windows-Software/Graphic-Design/gimp.php  Gimp is freeware "similar" to Photoshop.  If you can't afford Photoshop or Photoshop Elements (either of which I highly recommend) this is a decent alternative and does much of what you would need as an artist on the web. Stitch two part scans of your images together, resize for the internet, and add watermarks to help protect your work and ensure credit when others use it on thier website.   I'll post tutorials later for some of the basics, but there are many all over the web to get you started.

http://www.deviantart.com/  Deviant Art is a website where you can showcase your artwork easily without designing an entire website, you can also network with other artists and give and recieve feedback.

http://www.mickiemuellerart.com/Art-Step-By-Step.html  My art, step by step on my website, for those interested.

http://www.homestead.com/  Homestead is where I designed and host my website, it's pretty simple to use even if you don't know html code (which I don't) you can easily design and manage your own website.  They have lots of easy to use tools.  The "free" offer is only a 30 day trial, so don't get all excited about it being free, but you can do alot with this system.

http://www.uline.com/  Uline offers shipping supplies, for large prints that won't fit into flat rate envelopes I like the Stay Flat heavy board kraft envelopes.  Their boxes all ship flat for easy storage.

Thanks to everyone who attended the workshop, I really enjoyed meeting you and discussing art and magic.  Now for more fun this weekend!